

How to Make Your Washing Machine Last Longer
A Washing Machine Is an Investment Worth Protecting
The average washing machine costs $600 to $1,300 to replace. If you buy one and use it for 15 years, you’re getting a great return on that investment. If it dies at 7 years because of neglect or bad habits, you paid twice as much per year of use.
The good news is that making a washer last longer doesn’t take a lot of effort or money. Most of it comes down to a handful of daily and monthly habits that take minutes but add years. This guide covers everything — how you load it, what you wash, how much soap you use, what to watch for, and when to call for help.
Habit 1: Load It Correctly Every Single Time
This sounds basic. Most people think they’re already doing it right. But overloading is the number one habit that shortens a washing machine’s life — and it’s extremely common.
Here’s what overloading does: it forces the motor to work harder than it was designed to, strains the suspension springs and shock absorbers, accelerates drum bearing wear, puts extra stress on the drive belt or transmission, and prevents clothes from tumbling freely, so they don’t actually get as clean.
The correct load size is three-quarters full. Not packed to the rim. Not stuffed until you can barely close the lid. Three-quarters full, with room for clothes to move around.
For top-loaders with agitators: load clothes loosely around the agitator. Don’t pile them on top of the agitator post.
For high-efficiency top-loaders (no agitator): spread clothes evenly around the wash plate at the bottom. Don’t ball everything up in one spot.
For front-loaders: fill the drum to about three-quarters. You should be able to put your hand in and move clothes around freely.
If you have more laundry than fits, do two smaller loads. This is not just advice for your machine — your clothes will be cleaner too.
Habit 2: Balance Heavy Items
Washing a single heavy item — a comforter, a bath rug, a pair of jeans — by itself is hard on the machine. That item clumps to one side during the spin cycle, creating an unbalanced load. The machine shakes, the sensors detect the imbalance, and the machine either stops the spin or keeps trying to spin with the drum way off-balance.
Even if the machine doesn’t throw an error, running unbalanced loads repeatedly accelerates wear on the suspension, bearings, and shock absorbers.
The fix is simple: pair heavy items with other items. Wash a comforter with a couple of towels to balance the weight. Wash jeans with a few shirts. Distribute heavier items around the drum rather than letting them clump together.
Habit 3: Use the Right Detergent — and the Right Amount
This is where a lot of well-meaning people go wrong.
Using the wrong type of detergent: High-efficiency (HE) washers — which includes all front-loaders and most modern top-loaders — require HE detergent. HE detergent is a low-suds formula designed for machines that use very little water. Regular detergent creates too much foam for the small amount of water in an HE machine. That foam doesn’t rinse out properly, leaves thick residue inside the drum and hoses, and over time can clog the drain pump and cause error codes.
If your machine has an HE symbol on it (a small H and E inside a circle), you must use HE detergent.
Using too much detergent: Most people use far more detergent than necessary. Detergent cap fill lines often suggest more than what’s actually needed. For a normal load in an HE machine, you typically need 1-2 tablespoons of liquid HE detergent — much less than the cap line suggests.
Too much detergent leaves residue that builds up inside the machine, causes musty odors, attracts bacteria, and in some machines triggers error codes. Less detergent means a cleaner machine and often cleaner clothes.
Avoid fabric softener in the drum: Liquid fabric softener leaves a coating inside front-load washers over time. Use dryer sheets instead, or add softener to the dedicated softener compartment in the dispenser drawer so it gets properly diluted.
Habit 4: Don’t Leave Wet Clothes Sitting in the Machine
This is one of the easiest habits to form and one of the most impactful for preventing mold inside front-loaders.
When a wash cycle ends and wet clothes sit in a warm, sealed drum, moisture and heat create ideal conditions for mold and mildew growth. That musty smell that’s notorious with front-load washers? It almost always starts with clothes that sat in the machine too long after the cycle ended.
The solution: remove clothes as soon as the cycle ends. If you tend to forget, set a phone timer when you start the wash. Most modern washers also let you set a delayed start or an end-of-cycle alert.
Habit 5: Leave the Door Open Between Uses
After you remove the laundry, leave the door or lid open. Even a few inches is enough.
For front-loaders especially, this is essential. The door gasket and drum need to dry out between cycles. A closed door traps moisture inside, and moisture plus warmth equals mold. Most front-load washer owners who have persistent mold and odor problems are keeping the door closed between uses.
If your laundry area is tight on space and leaving the door fully open is inconvenient, even a slightly open position — just unlatched and pushed mostly closed — is better than fully sealed.
Habit 6: Clean the Machine on a Schedule
A washing machine that’s never cleaned accumulates detergent residue, mineral scale, lint, and bacteria over time. This buildup causes odors, can clog the drain pump filter, and in hard water areas like Ventura County, leaves mineral deposits that accelerate bearing wear and damage internal components.
The schedule that keeps a machine in good shape:
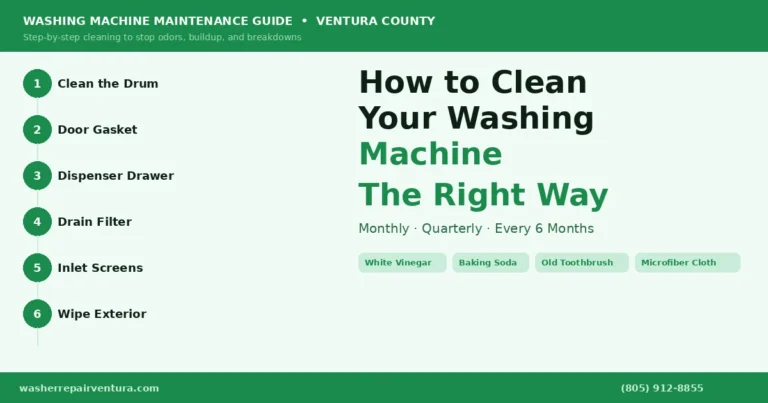
Monthly: Run a drum cleaning cycle. Use white vinegar, a citric acid solution, or a commercial washer cleaner tablet (like Affresh). Clean the detergent dispenser drawer.
Every 3 months: Clean the drain pump filter on front-loaders. This is the small filter behind the access panel at the bottom front of the machine. It collects coins, lint, and debris. A clogged filter strains the pump.
Every 6 months: Clean the water inlet screens on the back of the machine where the supply hoses connect. In Ventura County’s hard water, mineral buildup on these screens restricts water flow and triggers fill errors.
Habit 7: Check and Replace the Supply Hoses
This one can prevent a disaster, not just prolong the washer’s life. The rubber hoses that connect your washing machine to the hot and cold water supply can crack, bulge, or weaken over time. A burst washing machine hose can dump hundreds of gallons of water into your home in a short time.
Inspect the hoses every year. Look for cracks, bulges, brittleness, or any sign of wear. If they’re rubber and more than 5 years old, replace them — even if they look fine. The cost of two new hoses is far less than the cost of water damage.
Consider upgrading to braided stainless steel hoses. They’re more resistant to bursting and last longer than rubber. They cost a bit more but are a worthwhile one-time upgrade.
Habit 8: Don’t Wash Things That Don’t Belong in a Washer
This seems obvious, but it’s a surprisingly common source of washer damage.
Items that can damage your washing machine: large rugs with rubber backing (the rubber breaks apart and clogs the pump). Work clothes with sand, gravel, or grit embedded in the fabric (abrasive particles damage the drum and pump). Items with sharp metal hardware — zippers, belt buckles, underwire bras — can scratch the drum interior. Anything with loose coins in the pockets (coins are the leading cause of drain pump damage).
Before loading any item, check the pockets. Empty them completely. Turn jeans and clothes with metal hardware inside out before washing to protect the drum. Wash work clothes that are heavy with grit separately and consider pre-rinsing them.
Habit 9: Don’t Ignore Small Problems
A washing machine rarely fails all at once out of nowhere. Most major failures start as small problems that were ignored. A slightly unusual noise becomes a bearing failure. A small leak becomes a bigger leak. Mild vibration becomes violent shaking.
If your machine starts making a new sound, vibrating more than usual, taking longer to fill or drain, leaving clothes wetter than normal after the spin cycle, or showing any new behavior that it didn’t do before — investigate it. Don’t just wait and hope it resolves itself.
Small problems are usually small repairs. The same problem left alone for 3-6 months often becomes a large repair. And a large repair that’s ignored can become a machine that’s not worth repairing at all.
Habit 10: Get a Professional Inspection If Something Seems Off
If you’re not sure what a noise or behavior means, a service call can save you money. A technician can identify early-stage problems — worn suspension springs, a belt that’s starting to crack, bearings that are showing early wear — before they become full failures.
Think of it like a car. You don’t wait until the car breaks down on the highway to check the oil. A little proactive attention catches problems early, when they’re cheap and easy to fix.
How Long Can a Well-Maintained Washer Last?
With the habits in this guide, here’s what you can realistically expect:
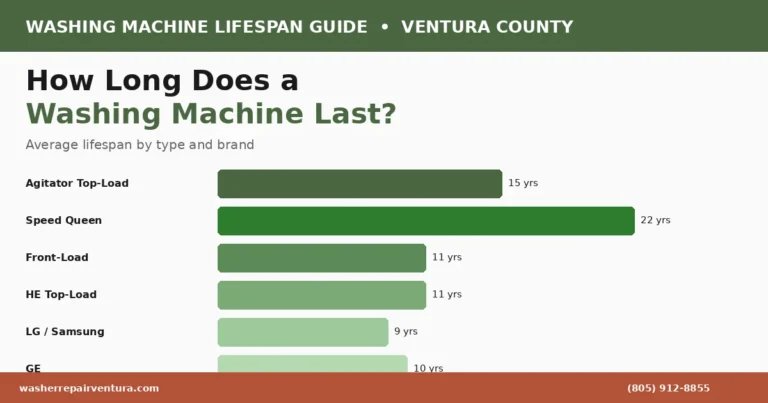
Agitator top-loaders: 13-18 years. High-efficiency top-loaders: 11-14 years. Front-loaders: 11-15 years with regular maintenance of the gasket, filter, and drum.
These numbers assume reasonable use — not 12 loads per day in a family of six. But for the typical household doing 5-8 loads per week, a well-maintained machine can easily outlast these averages.
We’re Here When You Need Us in Ventura County
Even a well-maintained washer will need a repair eventually. When it does, we’re here. We service all major brands throughout Ventura County — Ventura, Oxnard, Port Hueneme, Oak View, El Rio, and Saticoy. Same-day service is usually available.
Call (805) 912-8855 or book an appointment online.